Well, it’s been a while since I updated the blog! Here’s a tutorial for you.
Faux Tearing
 Step 1 – tear a piece of scrap paper, eg photocopy paper and place over part of your card. This will be a mask for the part of the card you don’t want stamped. Here I’m using Whisper White as my card panel.
 Step 2 – ink up your chosen background stamp. Here I’m using the Paisley background stamp, and inking it with Perfect Plum stamp pad. Note I haven’t covered the whole stamp as some of it won’t be used, so I’m trying to save on ink. I find it easier to get coverage on the background stamp by rubbing the ink pad on the stamp rather than dabbing.
 Step 3 – stamp onto the partly covered up card. With a large stamp or background stamp you may want to rub your hand over it to ensure you get even coverage.
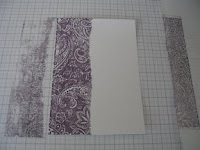
Step 4 – carefully lift off your stamp to reveal your image. You will have an image on part of the card with a slightly rough looking edge where the torn paper was covering up the card.
 Step 5 – line up your torn piece of scrap paper with the image, leaving a small gap. Then with a sponge dauber, using the same ink colour (Perfect Plum) as you used for the background stamp, dab along the edge, as shown.
 Step 6 – remove your scrap piece of paper to see how you’ve gone. 
Step 7 – put the card panel onto a card base and add embellishments to finish your card.

Products Used, all Stampin Up!:
Stamp Sets: Paisley Background Stamp, Polka Dots & Paisley for the flower and sentiment
Perfect Plum cardstock for the base card
Whisper White cardstock for the panel
Elegant Eggplant cardstock for the 2 smaller stamped images
Whisper White Craft Stampin Pad for the flower and sentiment
Perfect Plum Classic Stampin Pad for the background stamp
Basic Black ¼ inch Grosgrain Ribbon
Sponge Daubers
Happy stamping!

