Hi,
Thank you for stopping by today. Here are the cards we will be making in today’s class:
This class features the gorgeous Perennial Lavender Designer Series Paper from Stampin’ Up! This patterned paper is in the January – April 2024 Mini Catalogue. All supplies are listed below and can be ordered through my online store.
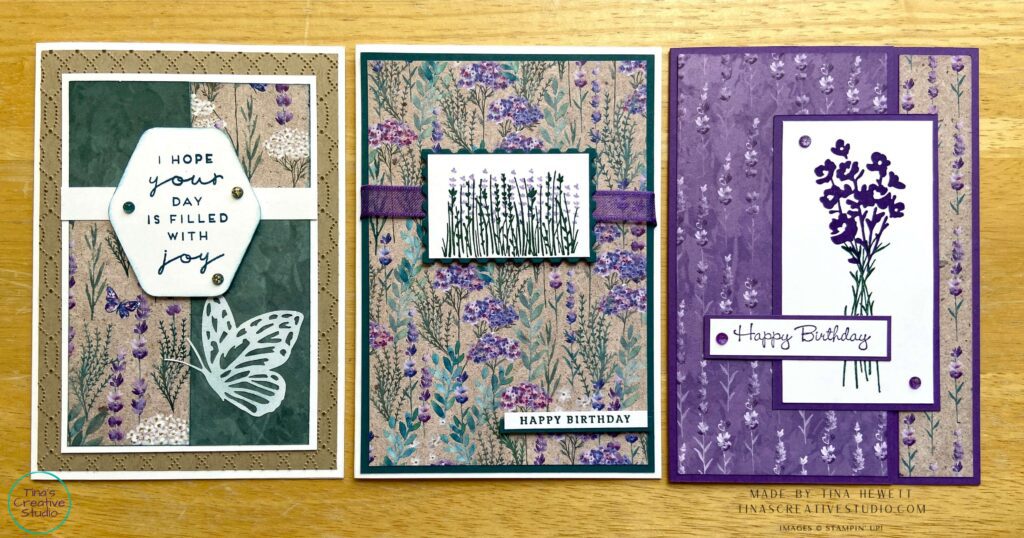
Card 1 – Joy
The layout for this card was inspired by the January 2024 SheetLoad of Cards by Call me Crafty Al – you can find her sketch, supply list and video at https://www.youtube.com/callmecraftyal. I adapted her sketch to fit a metric card base that we use in Australia.
Measurements:
Thick Basic White card base: A5 (14.8cm x 21cm) scored and folded to 14.8cm x 10.5cm
Crumb Cake: 14.3cm x 10cm
Basic White: 12.8cm x 8.5cm, scraps
DSP: 12.3cm x 8cm.
Supplies:
Stamps: Heartfelt Hexagon
Embossing Folder: Softly Sophisticated
Punch: Heartfelt Hexagon
Ink: Crumb Cake, Pretty Peacock
Cardstock/Paper: Thick Basic White, Crumb Cake, Basic White, Perennial Lavender 12 x 12 Designer Series Paper (DSP)
Embellishments: Petal Pink and Pretty Peacock Foiled Gems, Paper Butterfly Accents
Instructions:
- Emboss the Crumb Cake panel with the Softly Sophisticated 3D embossing folder. Using a brayer, lightly apply Crumb Cake ink to the raised areas of the embossed panel. Adhere to the card base.
- Cut the DSP (Designer Series Paper) in half lengthwise so you have 2 strips that are 4cm wide. Cut 4cm off the top of each strip. Flip over one of the square pieces and one of the rectangular pieces to show the other side of the paper. Sponge the edges with Pretty Peacock ink using a sponge dauber. Glue to the white panel leaving a white border. Glue an offcut strip of Basic White across the join where the 4 patterned paper pieces meet. Trim the ends to size. Adhere to the card front as shown.
- Stamp the greeting onto a scrap of Basic White in Pretty Peacock ink and punch with the Heartfelt Hexagon punch. Sponge the edges of the punched-out shape with the same colour ink. Attach to the card front with Dimensionals. Add a few Pretty Peacock Foiled Gems for bling.
- Lightly sponge one of the Paper Butterfly Accents with the same ink and glue to the card front.
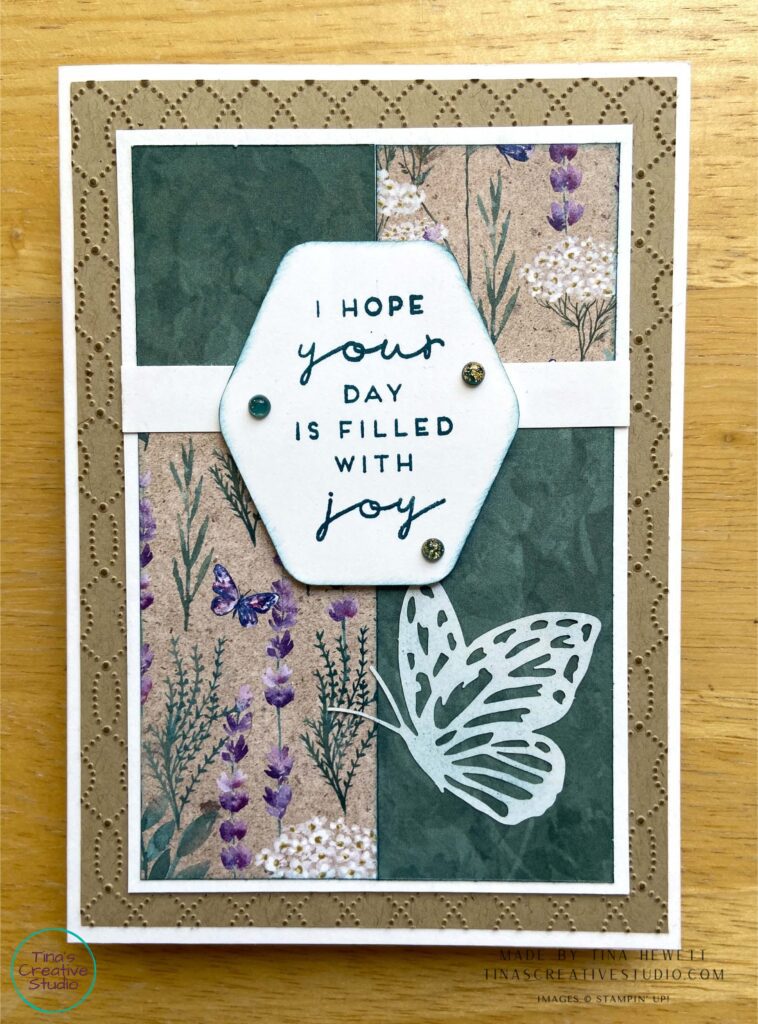
Card 2 – Birthday
Measurements:
Thick Basic White card base: A5 (14.8cm x 21cm) scored and folded to 14.8cm x 10.5cm
Pretty Peacock: 14.3cm x 10cm, scrap strip
DSP: 13.8cm x 9.5cm
Basic White: 5.5cm x 3.5cm, scrap strip.
Supplies:
Stamps: Painted Lavender, Sentimental Park
Dies: Perennial Postage
Ink: Shaded Spruce, Highland Heather
Cardstock/Paper: Thick Basic White, Pretty Peacock, Basic White, Perennial Lavender 12 x 12 Designer Series Paper (DSP)
Embellishments: Gorgeous Grape sheer ribbon (retired)
Instructions:
- Use one of the Perennial Postage dies to cut a rectangle from the Pretty Peacock panel. The rest of the panel will become the mat for the DSP. Adhere the DSP to the panel. Wrap a short piece of ribbon around the panel and secure on the back with tape. Adhere to the card front.
- Stamp the lavender/grasses image in Shaded Spruce ink on the small Basic White panel. Stamp the tiny flowers in Highland Heather ink multiple times across the green stems. Adhere the stamped panel to the postage stamp rectangle die cut. Use Dimensionals to attach to the card front over the ribbon.
- Stamp the greeting on a narrow white strip in Shaded Spruce ink. Trim to size. Adhere to a slightly longer narrow strip of Pretty Peacock cardstock and attach to the card front with Mini Dimensionals.
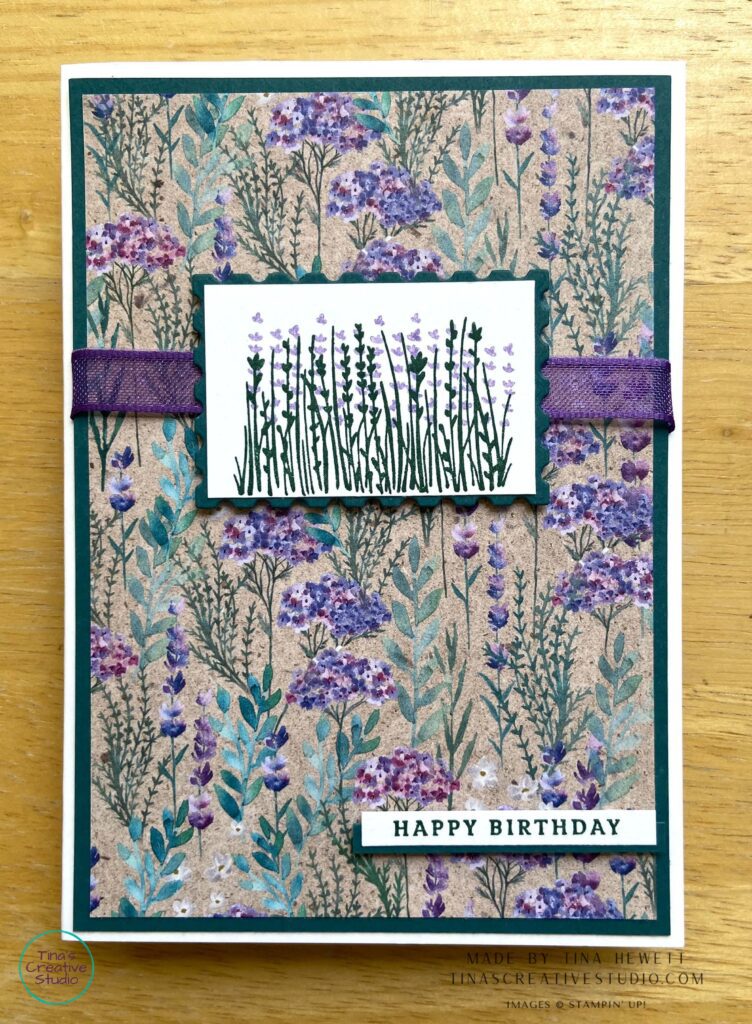
Card 3 – Purple Birthday

Measurements:
Gorgeous Grape card base: A5 (14.8cm x 21cm) scored and folded to 14.8cm x 10.5cm
DSP 1 (purple): 14.3cm x 7cm
DSP 2: 14.3cm x 2.5cm
Gorgeous Grape: 10cm x 5.5cm, scrap strip
Basic White: 14.3cm x 7cm, 9.5cm x 5cm, scrap strip.
Supplies:
Stamps: Painted Lavender, Go To Greetings
Inks: Shaded Spruce, Gorgeous Grape
Cardstock/Paper: Gorgeous Grape, Basic White, Perennial Lavender 12 x 12 Designer Series Paper
Embellishments/Trim: Purple Fine Shimmer Gems
Instructions:
- Cut 3cm off the front of the card base.
- Sponge the edges of the DSP pieces with Gorgeous Grape ink. Adhere the purple piece to the cut-down card front. Adhere the other piece to the left side of the inside of the card. Adhere the 14.3cm x 7cm white panel to the inside of the card.
- Stamp the bunch of flowers in Gorgeous Grape ink towards the top of the smaller white panel. Stamp the bunch of stems in Shaded Spruce ink towards the bottom of the panel, overlapping the flower stems. Adhere the panel to the purple mat. Adhere this panel to the card front flap, ensuring you only put glue/tape on the left side of the panel.
- Stamp the greeting on a strip of Basic White, trim to size. Adhere to a slightly wider strip of Gorgeous Grape cardstock, trim to size. Adhere to the card front as shown. Watch the video for a tip on this. Add a few Purple Fine Shimmer Gems for bling.
Here’s a link to the video with tips and tricks: https://youtu.be/-bf4WYFwIj0
Grab your free download with the instructions to make these cards!
Here are the supplies I used to make these cards, click on an image to go to my online store:
Product List
")
")
")


")


 Designer Series Paper")


 Gorgeous Grape Sheer Ribbon")


