Hi,
Thanks for visiting my blog today. My lovely class ladies have been requesting cards for kids and men, so I have been adding them in the class mix. Today’s post is about the cute robots from the Nuts & Bolts stamp set, from the 2022 January – June mini catalogue. In my latest classes we made these cards:
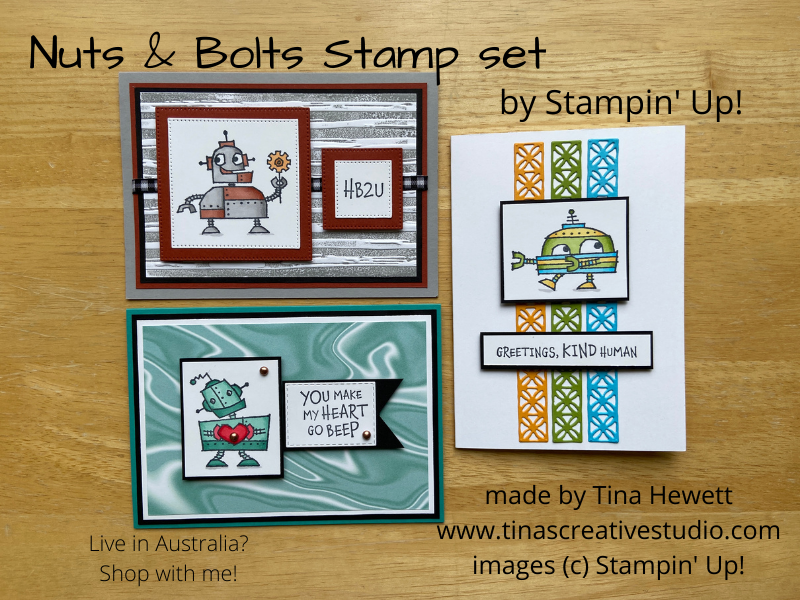
They were fun to make, and the little robots “came to life” after they were coloured in with Stampin’ Blends alcohol markers – how cute are they? Read on for more info on how these were made…
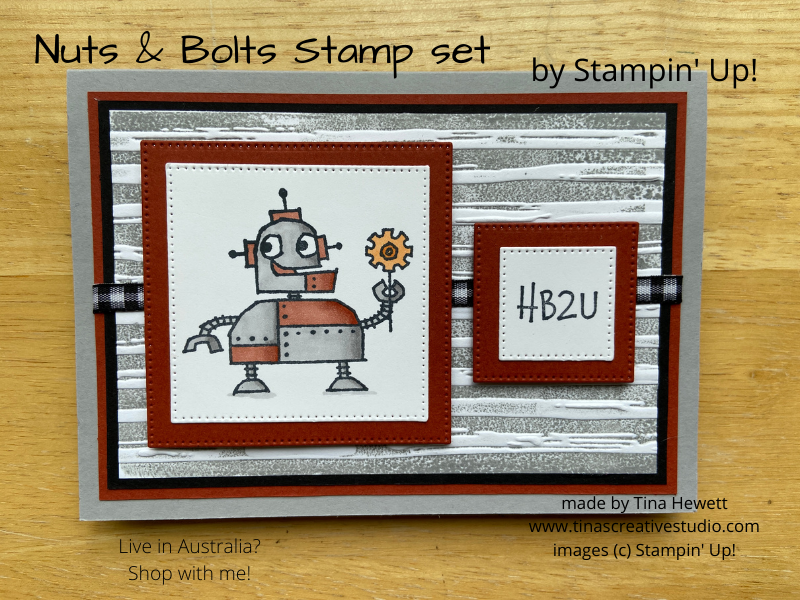
For the first robot cutie I stamped him onto Basic White cardstock using Memento Tuxedo Black ink, which is the ink to use when you are colouring with alcohol markers. I used Smoky Slate and Cajun Craze for the robot and Pumpkin Pie for the flower. Make sure you add a shadow to the feet with a light Smoky Slate marker. I only did basic colouring by using the darker shade of each marker along the right edge of each area, then used the lighter shade to blend the colour across the area.
I then used a stitched square die from the Stylish Shapes set to die cut him out, and layered the white layer on a Cajun Craze layer which has been die cut with the next size up stitched square die. Tip: cut the squares from the Cajun Craze mat used as the first layer on the card base. I stamped the greeting in Memento black ink onto another piece of Basic white and die cut that out with a small stitched square die, again matting that onto a larger square die cut from the Cajun Craze mat.
The background layer was created by swiping a Smoky Slate stamp pad on the flat side of the stripes embossing folder, placing a piece of Basic White inside the folder and running it through my Stampin’ Cut & Emboss machine. It gives a really cool effect. I then adhered this layer to a Basic Black mat and to the Cajun Craze mat. I wrapped a piece of black & white gingham ribbon around the matted layers and adhered them to the card front. The stamped panels were then added to the Smoky Slate card front on Dimensionals.
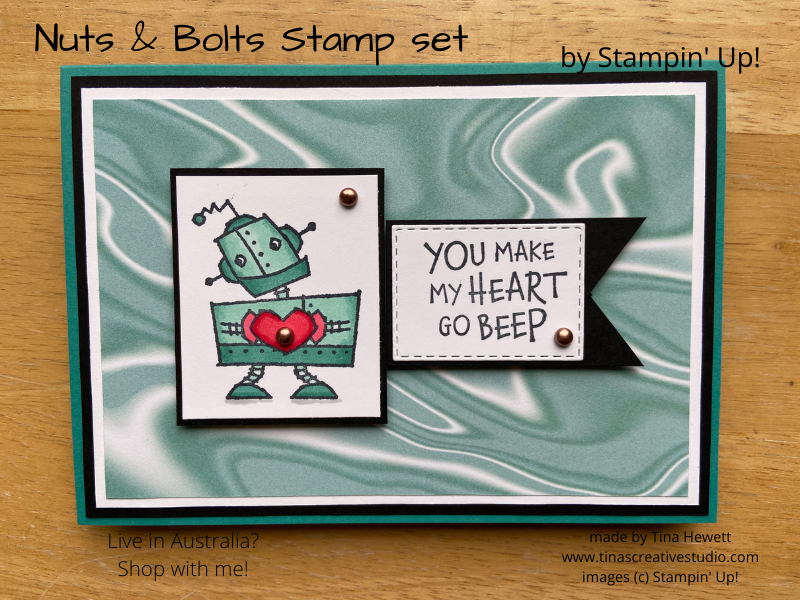
For this robot cutie I stamped him onto Basic White cardstock using Memento Black ink, and coloured him in with Bermuda Bay, Pool Party and Poppy Parade Stampin’ Blends alcohol markers, and added a shadow to the feet with a Light Smoky Slate marker. I trimmed the piece down and matted it onto a slightly larger panel of Basic Black cardstock. I stamped the greeting in Memento black ink and die cut it with a small stitched rectangle die. I matted this onto a slightly wider strip of Basic Black and cut a flag/banner end with scissors.
For the background I chose one of the patterns from the Simply Marbleous Designer Series Paper pack that was available as a freebie during Sale-a-bration earlier this year. I matted this layer with Basic White and then Basic Black and added the layers to the Bermuda Bay card base. I used Dimensionals to adhere the stamped panels to the card front and added a couple of Brushed Metallic dots for bling.
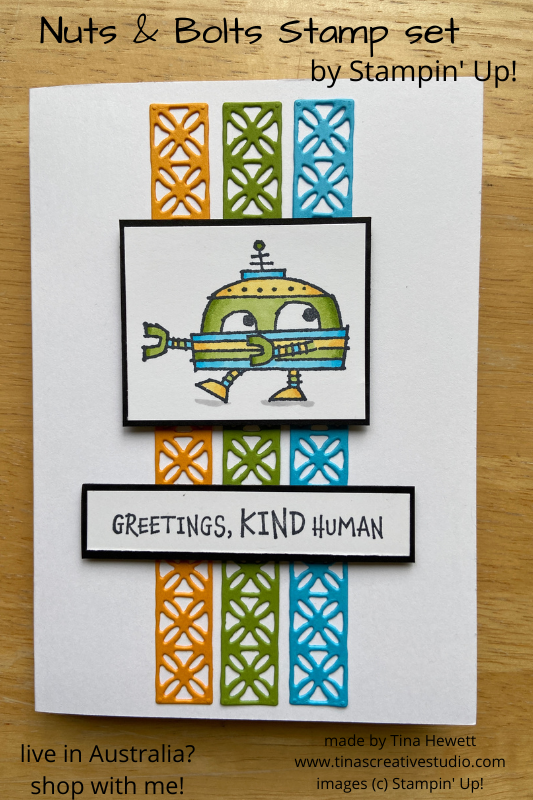
For this robot cutie I chose to colour him with Mango Melody, Granny Apple Green and Tahitian Tide Stampin’ Blends, with a little Light Smoky Slate for a shadow under his feet. It wasn’t until after I had made the card that I realised that the Mango Melody Stampin’ Blends have retired, even though the colour is still current. You can get a similar effect with Daffodil Delight markers. I trimmed the panel to size and matted it on a slightly larger piece of Basic Black. Again, the greeting was stamped in Memento black ink on Basic White and matted onto Basic Black.
This time for the background I die cut the border pieces from the Paradise Palms die set in Mango Melody, Granny Apple Green and Tahitian Tide cardstock. I glued them to the Thick Basic White card base and used Dimensionals to adhere the stamped panels to the card front.
I’m really happy with how they turned out. If you’d like to make these cards, here are the supplies I used.
Product List


 Gingham Ribbon")


Happy Stamping,
Tina


